How to Add Textures to Your HDR Photography
Hey! My name is Bryon Lippincott, I am a photographer based out of Omaha, Nebraska. I would like to thank Sean for the opportunity to be on his site and tell you about blending textures with HDR photos.
I found HDR photography about a year and a half ago and have never looked back. I am hooked on the incredible depth of color and tonal range that is possible.
For HDR processing I first tried merging to HDR in Photoshop CS3 but I soon found that it took too much time and didn't come out the way I wanted. I have since been working with NIK HDR Efex Pro and I just upgraded to NIK HDR Efex Pro 2. I am really enjoying the new version of HDR Efex, it is a significant improvement from the original version. I feel that it allows me more control of the details in the final image.
I began playing with adding texture to photos about a year ago when I saw a few people including Trey Ratcliff adding textures to photos. It seemed like an interesting idea to take a photo and make it look more like your personal artwork than just a straight photo or HDR photo. Texture is not something I use on every photo. I find myself adding texture to accentuate movement, to give background bokeh (blur) a little bit of extra character, or to make a plain blue sky look a little bit more like a painting than a blank blue slate.
Let me show you how textures can add to an HDR image with a picture I took last winter. Here is one of the images from a bracked set that I used to create my HDR image.
 A Shot Before HDR

First off I should mention that I shoot all my images in RAW format because I want all the available data there to make adjustments and edits with in post processing. I also export my bracketed sets from Lightroom 4 to HDR Effex Pro 2 in the .Tiff format.
Step 1: Export to HDR Efex Pro 2
The screen below shows the opening set up screen for HDR Efex Pro for this set of brackets. I chose to select the alignment and ghosting reductions because it was a shot of a live animal and there was a good chance that it was going to move and cause blurring.

Step 2: HDR Methods and preset
Usually I edit HDR images manually, I rarely like the presets that come with the software. However in this case I chose the Deep 1 preset from the presets panel on the left side of the screen and liked the result. Then saved it to back to lightroom.

Step 3: Color and Tonal corrections in Lightroom 4
Back in Lightroom I do some basic color and tonal corrections in the Develop module. For this image I increased the saturation of the oranges, yellows and reds a little. I also reduced saturation in the greens. Finally I adjusted the hues as follows: I made the reds more orange, the oranges more red, and the yellows more orange. Not a lot but just a little to get the image to a warmer tonal range.
I also moved the clarity slider up to +60 to bring some extra detail into the horse.

I also cropped the image to eliminate the second horse on the left edge of the full photo.

Step 4: Open Image in Photoshop and Place Texture File
After opening your HDR file in Photoshop (I'm using Photoshop CS6, but you can use Photoshop Elements or onOne Perfect Layers 2 as well) select the file menu and then select place.

This will open up file explorer on your computer. For this picture I am going so select Sheer Face from the red tinted textures and click place on the bottom right corner

Photoshop will open the file you select as a smart object layer and allow you to rotate, and change the size of the image.

Once you have it where you want it right click and select place.

Step 5: Rasterizing, Blending Mode and Layer Mask
The next step is to rasterize the layer, so go to the layer menu and select click Rasterize then Smart Object

Now over in the Layers panel click on the icon to add layer mask.

Once you have added the layer mask, we can select our blending mode. The most common blending mode for textures is overlay. So for this image we will use that.


Step 6: The Opacity of the Blending Mode and Using the Mask Layer
Here is the texture applied to the image in blending mode at 100% opacity.

Now we can adjust the opacity to get the image to where we like it. For this image I set it at 38%.

The last step is to use the mask layer to remove a little extra texture from areas that we want to have a less textured effect.
To do this you click on the mask layer that we created next to the texture layer, then select the paint brush tool and make sure you are painting with black. You can adjust the opacity of the brush on the top of the screen and of the screen and change your brush size there as well. I used the brush at about 25% to reduce the texture on the horse and on the grass in some spots where I thought that it was too heavy. Once I was done I saved it back to Lightroom.

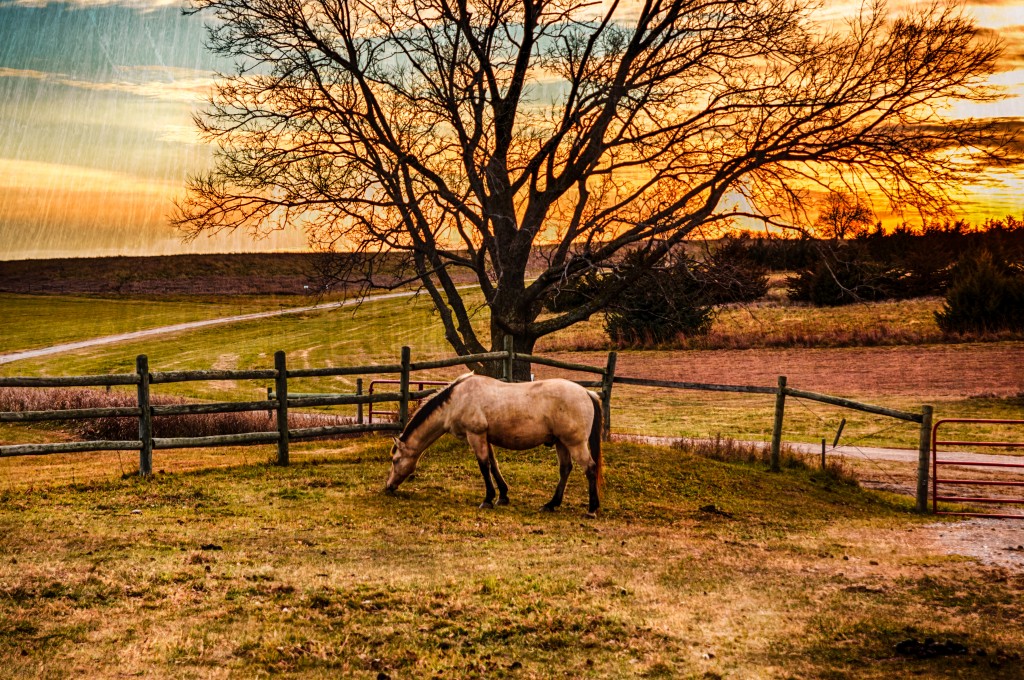
As you can see texture doesn't need to be overpowering to have an effect. In this photo it adds a little structure to the clouds in the sky and increases the saturation in the color on the rest of the image.
Here is the final image:

I have worked over the last 6 months to create a texture file library for my use and to offer to others interested in texturing. It's available at TextureAPhoto.com.
I started doing textures with Photoshop CS3, with the arrival of the Adobe Creative Cloud, I have upgraded to Photoshop CS6. However you do not need anything nearly that fancy to add texture to your photos, all you need is a program that allows you to add layers, blend the layers and use masks to alter the layers. You can use Photoshop Elements 10, or onOne Perfect Layers 2 and get almost the same results. Photoshop Elements 10 is only $64 from Amazon and onOne Perfect Layers 2 is free!!
I have full length tutorials for all three programs with screen shots available on my website Texture a Photo. The tutorials cover using multiple textures as well as transparent textures and contain a lot more detail.†We have also included full video tutorials for the software programs mentioned above in the Texture A Photo Collection.