How to Create a Black and White HDR Photo
Want a deal on all the software I use for this tutorial? Use coupon code “hdrpromo15” for 15% Silver Efex Pro, HDR Efex Pro and any other software from Nik.
I like unique photography.
That's what initially drew me to HDR. It was different, it was cool, and while yes, it can be WAY over done, it forces people to stop and say, “hey, something is different here.”
I like black and white photography for the same reason. You can take a photo and make it tell an entirely different story simply by taking the color out of it. It forces the person viewing it to connect their own dots, and come to their own conclusions about the story that a particular story holds.
It's for this reason that lately I've been more and more interested in black and white photography. To be honest, I'm surprised that we don't see more of it.
Ever since I saw my first black and white photo that Ansel Adams took, I was hooked. As I got older and began to notice, that he may in fact have been one of the pioneering founders of HDR, I was even more drawn to the idea.
That said, things are dramatically different than they were back in Ansels day, and I recognize that. It's much easier for just about anyone to use computer technology to make them appear to be a better photographer than they are – and I'm absolutely no exception to this.
With that said, I'd like to share my work flow for creating black and white HDR photographs.
Getting Started: Creating the HDR
This entire process is going to be different for everyone. Everyone has their own preferred software, presets, templates, quirks, whatever. Hopefully you get some value out of seeing how I go about processing my shots.
Last month I found myself in Yangshou, China for a couple days. While I didn't get nearly as many shots as I'd hoped, I did get a few that I was particularly fond of. This is the image we'll be starting with:

The original “Normal” Bracket
With this image I really wanted to bring out some of the detail in the sky, while also drawing interest to the fire in the background, which I think is an interesting component to the shot.
I'll also preface this post, but saying I realize there are some focusing issues with this one. I was in a bit of a hurry and didn't shoot this on a tripod. That said, I still thought it was a cool image and perfect for what I was trying to do here.
Step 1: Edit Brackets in Photoshop
If there are any imperfections in any of my brackets or if I want to boost the clarity I'll look at each of the photos before I put them in HDR Efex Pro or Photomatix. This particular series happened to be shot in jpegs, but if I were shooting raw I have a preset that boosts the clarity in Photoshop before being processed.
I rarely touch exposure or contrast until after I've combined the brackets.
Step 2: Combine Brackets Using HDR Software
For this shot I used HDR Efex Pro. When I'm doing black and white HDR shots I generally like to use HDR Efex Pro, because I'll be using Silver Efex 2 later on, and all of Nik's products work very well together within Photoshop. It makes workflow, much easier.

Already looks pretty good right?
When I'm creating an HDR that I know I'll be converting to black and white I try and take notice of a couple key things.
- Don't make it too dark. Sometimes I'll neglect the full dynamic range if it will lend to a cooler or more thematic image. If I'm going to be converting it to black and white however, I can worry about that stuff later. I want to make sure I still have enough detail and range to work with when I make the conversion.
- Keep it realistic. Only thing worse than a halo-ed out, unrealistic HDR photo? One that's been converted to black and white.
When I'm doing this I use either the “realistic strong” or “realistic balanced” preset in HDR Efex Pro. I'll then adjust the various sliders as necessary. Once again, making sure I don't go too dark or underexposed, so that I have plenty of range to work with in my black and white conversion.
At this point, I also don't do any “finishing”. I don't add any borders, vignettes, etc. I try and keep it basic and do most of my creative work inside Silver Efex Pro.
Step 3: Reduce Noise Using Topaz Denoise
As we all know whenever you go through the HDR process you're going to have increased noise due the exponential effect you have been combing brackets. I usually use Topaz for this, for more details you can check out this tutorial on it.

Step 4: Import into Silver Efex Pro 2
There are other programs out there for black and white conversion such as Topaz's B&W Effects and Photoshop itself. I haven't used the offering from Topaz, but I can say that I've been extremely impressed with how Silver Efex Pro works.
Just like all of Nik's software it's easy to use, plays nicely with Photoshop, and is easy enough for a total beginner, and advanced enough for even the most seasoned veterans.
As you can see, when it first came into Silver Efex Pro, the neutral setting was a little, well, neutral. It was too flat for me.

In this case I found the “Full Dynamic (Smooth)” preset to be a great starting point. From there I boosted the contrast to 30% and structure up to 41%. It's the structure that really brings the photo to life, especially in the foreground around the road and the tuk tuk itself.
I then bumped the shadows up to bring out more of the detail in the background.
From here there are two routes you can go depending on what you want to do.
Step 5: Selective Color?
In keeping with the idea of creating unique looking photographs, depending on what you're trying to do at this point you can start utilizing the Selective Color features provided in Silver Efex Pro. While there's a slight learning curve to figuring out this whole selective color thing, now that I'm used to it, I really like the way Nik handled this.
The key is to make sure your constantly adjusting the size of your control points. For instance the Tuk Tuk in this image has some narrow bars we need to add color to, and we end up bring in the background if we don't reduce the size of the points.

You need more control points than you might initially think
With this one I initially had each control point set to 100% for selective color, but realized it was too much and didn't go with the feel of the image. So I backed it down to about 25% on most of them and you can tell it gives the tuk tuk a really worn image that goes well with everything else.
I also added a few control points right below the tuk tuk to give it a little bit of a glow in its environment.
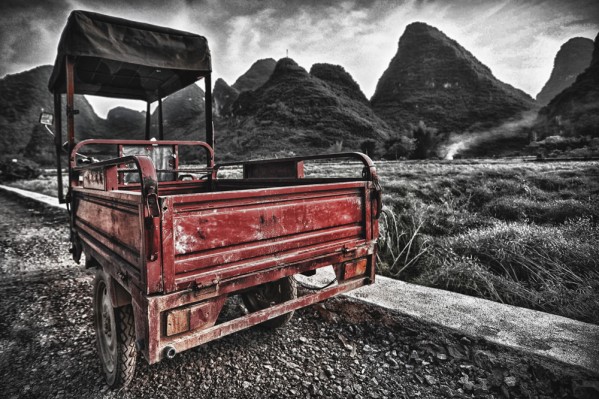
Here's the final image:

Step 6: Finishing with Border and Vignette
If you choose not to go with the selective coloring, then all that's left is to look at our finishing techniques. Depending on the intended use for the photo, you have the ability to add a variety of nice looking borders to the image, but I usually just go for a slight vignette, burnt edges and away you go.
This is the final image without coloring:

Tuk Tuk in Yangshou China
So which one do you like better?
Check out Silver Efex Pro 2 if you haven't already, I'm a big fan. Also use the coupon code “hdrpromo15” for a 15% discount on that, and any other software from Nik.
Personally, I do not like HDR.
“…it forces people to stop and say, “hey, something is different here.”
I might be more inclined to subscribe to the notion that how a subject is seen, interpreted, and framed should lend itself to the presentation of something different.
I like your comment about Ansel Adams. In addition to digital, I have a darkroom and develop my own large and medium format b/w film. Push or pull development using the zone system is pure HDR processing.
My workflow for digital is to convert RAWs to TIFFs, then load into Photomatix, convert to b/w in PhotoShop, process in NIK Silver Efex, then add high-pass sharpening. The Silver Efex brings the images to life (preset 005 is my favorite for most of my images). Great program!!
I haven’t learned yet how to use control points, sounds like something I should do.
Jack
So simple, yet so eye-popping.
As a photographer I had no idea what HDR was! Yes this could be way overused, just like photoshop, but done correctly is stunning.
[…] so I wanted to see what would come out. Some of the things — like “Compose a spectacular HDR photo” — were pretty simple. Others items — such as staying at the Burj al Arab Hotel in […]