How to Properly Shoot (and Edit) Night HDR Photos
As I've discussed in previous posts, I like to do HDR in ways that are a little bit more unique. A couple months ago we talked about black and white HDR, and today I want to talk about why I like to take night HDR photos.
One of the things I like most about HDR is the ability to take hyper realistic photos, when done properly. Using the medium at night, allows you to do essentially the same thing, without blowing out all of the highlights as you might with a typical long exposure shot.
That being said, if you want favorable results, you're going to need to follow some basic rules that are going to give you the best chance of capturing that perfect shot.
Let's take a look at what these steps are, as well as some examples of HDR night photography in different situations.
Step #1: Use a Tripod and Remote Shutter Release
No brainer, right?
Well I'll admit I shoot HDR handheld much more often than I should – but when you're doing it at night you absolutely have to use a tripod to get a clear image. With some of these photos we're going to be taking extremely long exposures, so there simply is no way to do it properly without a tripod.
Additionally, you're going to want to use a remote shutter release as well. Even the slightest movement of the camera can lead to a blurry shot, so you want to do everything you can to minimize this. Also make sure you have a sturdy enough tripod for the lens you're using.
Here's an example of a photo that I shot handheld at night(ish), and how it just doesn't work:

Notice the background is less crisp. You can see this in the Caesars and Flamingo signs.
Step #2: Shoot in Raw
There have been more times than I care to count where I've been shooting a night HDR shot, and something is off. I'll forget to change the ISO, I won't apply the same aperture to each of my brackets, something will bump my tripod during a long exposure (or worse, I'll actually neglect the tripod altogether).
I've missed so many good opportunities because one of those was off.
By shooting in RAW you minimize the chances of you blowing the setting altogether. In a pinch you can create 3 brackets from a single RAW image. It's not ideal, but if your long exposure is blurry, and the rest have drastically different apertures, then using a RAW image is better than nothing to salvage your scene.
Step #3: Use Manual Focus if Possible
If there's one aspect of my digital photography I still haven't gotten ahold of, it's focus and focus points. I always seem to struggle getting the right things in focus at the right times.
Using manual focus during your brackets helps to minimize any issues you might have with your brackets. I usually place it in manual, select the focus point, and leave it there for all three shots. If your eyesight is bad, viewfinder isn't calibrated or you have other reasons for not wanting to focus manually, you can still get setup with autofocus.
Place it in single focus autofocus and have it select the position you want to target. Once it's there, switch back into manual and take your shots to ensure that it doesn't switch the focus on you.
Step #4: Longer Shutter Speeds, Lower ISO, Higher Aperture
Different photographers are going to have different opinions, but in my night hdr photos this has been the best combination of settings.
Here's a example of this:

Let's look at why I choose each:
- Long shutter: The longer the shutter the more detail I'm able to capture. If you're not doing HDR this will usually blow out the highlights, but since we're HDRing these suckers, I'm not too worried about it in this case.
- Lower ISO: Seems counter-intuitive right? Usually at night you're bumping your ISO up to 1600 or higher (eek!). I've left my ISO on auto too many times, I suppose. I'll get shots at 3200 ISO that are almost unsalvageable. Much of my shooting has been with a D5000 or D90, so if you have a better camera, this may be less of an issue, but high noise, especially after HDR, can ruin a perfectly good composition.
- Higher Aperture: In my night shots I almost always want as much depth-of-field as possible. I'm not going for wedding-blurred backgrounds here. So even if your inclination is to shoot at f1.8, your images will hate you for it. I'll go as high as F18 to make sure I've got clear photos and let the longer exposures do the work for me.

Step #5: Don't Be Afraid in Editing!
If you're used to doing basic interior or daytime shots, when you plug your first night shot into Photomatix or HDR Efex Pro the out of the box results could be scary, full of noisy and oversaturated photos that look unsalvageable.
Here's what I mean (it's actually less pronounced in HDR Efex Pro 2 than it was in the original version or in Photmatix):

Don't worry, almost always they look like this since your settings are setup for a different type of shot.
Back off the saturation, exposure, and contrast and then see what happens. You should see your photo come back to life a little bit, giving you more room to work and create that perfect image.
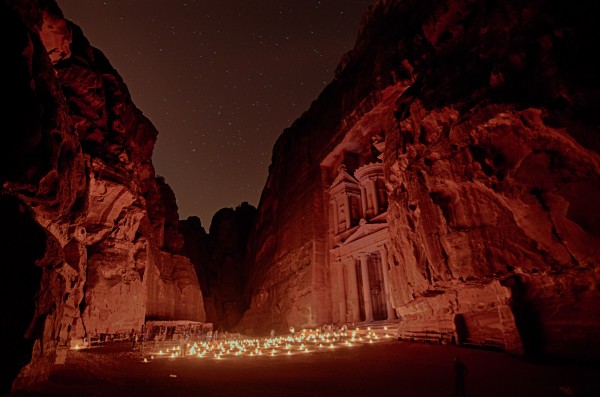
I've edited this particular image a dozen times, using a different look each time. I still like it this way though:

As you can tell you can use HDR at night in a wide variety of lighting situations. The shot at Petra was actually MUCH darker than it seemed, but the long exposure helped me to capture even more detail than I was expecting to be able to.
It can also work to bring out crisp details in a situation like shooting in Las Vegas where there are more highlights going on.
Using HDR Efex Pro 2 in tandem with Color Efex Pro 4 can lead to some extremely unique and captivating night shots. You can use the coupon code “HDRsoftware15” for 15% off each, as well as any other Nik Software product.